
Connecting Cover Comic Books are simply a large piece of art spread across several comic books.
-And in my opinion are one of the highlights of this variant cover generation of comics. But unless you can enjoy them all put together to form that amazing piece of art what good are they?
The simple solution, mount them in a frame that will properly highlight the entire connected set, but you may run into a couple small problems along the way so we are going to show you some tips on how to display your connecting cover comic books safely and securely so you can enjoy them the way they were meant to be viewed.
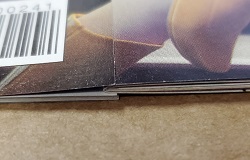
One comic book is twice as thick as the others
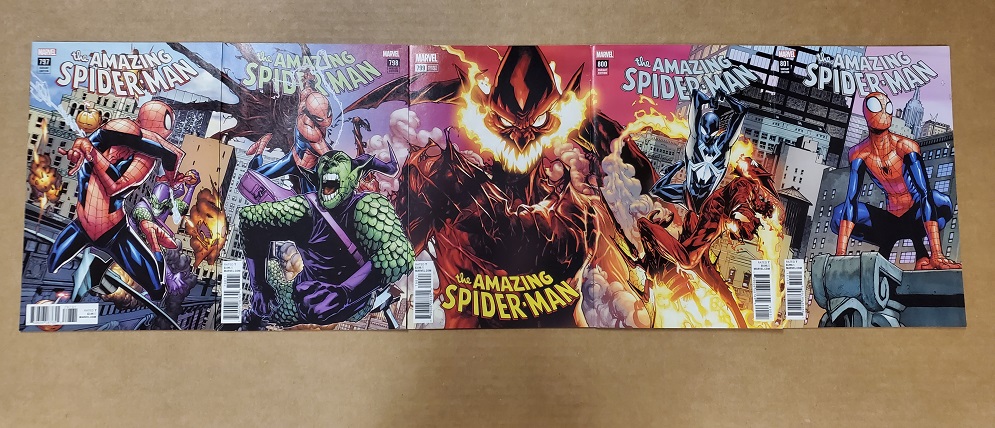
This is probably the most common issue and the question we get asked about most. A perfect example of this is in the Amazing Spider-Man #'s 797-801, in that awesome connecting cover set the ASM #800 is literally more than twice as thick with 80 pages as compared to issue #799 and #801 that only have 32 pages.
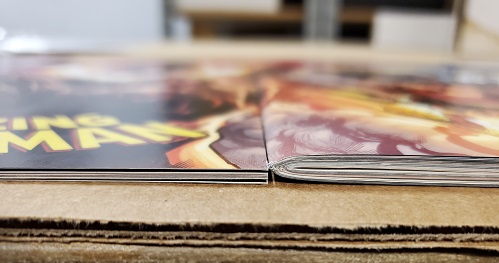
So how do we remedy this situation? Backer Boards! That's right, place a 2 or 3 backer boards behind the books on either side of the thick book(in this case #800), this helps distribute the unevenness. I also will add 1 or two behind issue #798 in this case just to help taper it down steadily.
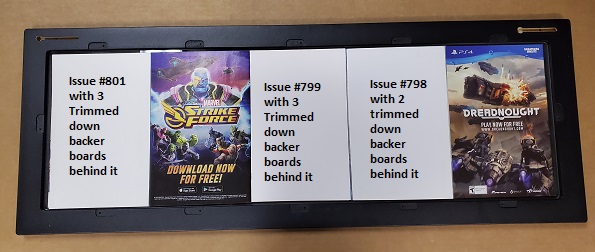
I would also recommend trimming the backer boards down just slightly, either to the same size or just smaller than the comic itself that way you don't see any of the white behind the comic.
Uneven art or artwork that does not line up perfectly from one comic book to the next.
This is definitely the most frustrating part for me, I have spent more time than I am proud to admit moving comics just slightly up or down or closer together to make the artwork line up.
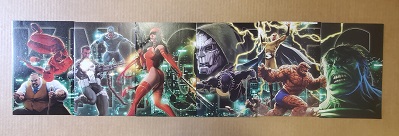
This is actually a very common problem and unfortunately can change from book to book. What I mean is because of how books (or covers in particular) can be printed, bound or cut just slightly off during the manufacturing process so this tip can be necessary quite often when it comes time to displaying your comic books so that the art is lined up nice and neat.

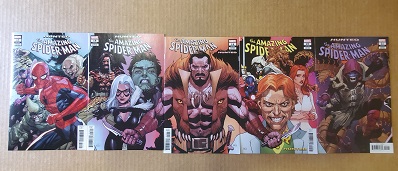
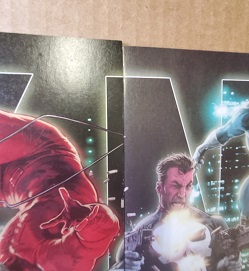
This "Hunted" story line from Amazing Spider-Man connecting cover set starts at #17(Legacy #818) and the middle book featuring Kraven himself has to be moved down about 1/4" to get the artwork to line up properly! The good thing is once you get them situated correctly inside the frame and hanging up on the wall you usually cannot see the books being off at the top and bottom but the artwork is noticeably nicer when lined up.
So when I frame my comic books I like to first start off by laying them out on a table with no bags or boards (so make sure the surface of the table is clean and dry), so that the books can be lined up nice and tight. Line up all the books evenly across the tops and bottoms and nice and tight together, this will give you an idea as to how well the artwork meets up with the book next to it and if any adjustment might be needed.
If some adjusting is needed now is the time to do it, move each book up, down, closer together, whatever is necessary to best line up the artwork. Then when you do transfer them to the frame you can keep track of which book (or books) need to be adjusted and if it is up or down and how much. Usually a simple and very minor slide up or down on a book will line up the artwork nicely but keep in mind if there are more books next to the one you just moved you will obviously have to adjust those the same way.
There have been a couple instances where I actually had to open the front cover of a book and slide the next book under it just about 1/8" to get the artwork right. If you do this be aware that this may cause a slight deformity to the cover of the book after being in the frame for a while. To help keep this from happening you can use some trimmed down backer boards here again as well. Slide one under the cover to help fill that gap caused from the comic book.
Once you are happy with the way the art lines up, take note of all adjustments you made (if any) and now place them face down on the acrylic front inside the pocket of the frame and don't forget that the comic books will need to be placed into the frame in the opposite direction as to how you had them laid out face up on the table.
Now make those adjustments to the corresponding books from your test layout and make sure all the books are nice and tight together as well as centered in the pocket of the frame so that the entire set of comic books is nicely centered in the viewable front window of the frame.
Now is the time to add your backer pieces for filler if you have a thicker book in the set, as discussed above.
Once all of your comics are centered, lined up as planned and backer boards in place for thicker books, be sure to carefully lay in your backer so as not to move the comics and make a mess of the hard work you just did!
Now simply close your hold down tabs applying nice light but snug to the tension on the screws
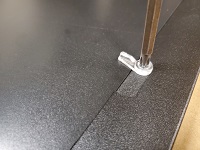
**Tip -Always remember to adjust your screws out with a phillips head screwdriver first until the tab is loose and will slide over the backer easily. Then gently tighten the screw until the tab holds in place firmly, you should be able to swivel it but it should not be loose enough to move or fall out of position on its' own. Do this to each screw so that the right amount of tension is on each one, just enough to hold the comics securely in place but not enough smash the book inside.
Ok, before you flip the frame over and look at your the results I want you to keep one very important thing in mind...there is a very good chance you will have to take the backer off and make some more adjustments! And you are anything like me, you may have to do this 3,5 or 10 more times! I have learned that I have a personal problem and I just cannot live with even just one book being even slightly out of alignment with the one next to it, or if the gap between the artwork is too far apart and needs to be tighter to the book next to it.
So check out your results and if you are happy with how it looks, CONGRATULATIONS! Hang it on the wall and become the envy of all your friends and family members. If you need to fine tune it a little just remember that when you remove and re-install the frame backer be gentle, this can be the main culprit when it comes to ever so slightly pushing a comic book out of place and mis-aligning the artwork of your masterpiece.

This all may seem a little overwhelming but I assure you if you take your time, the first time, you will be soo much happier with the results. Look at it this way, you are framing a piece of art, the same way a professional frame shop would if you brought your comics to them. Except when you use a frame from The Collectors Resource, (see them here) you are saving yourself a couple hundred dollars! -So celebrate and go buy some more comics!
If you found this article helpful and think your friends may appreciate the information as well please feel free to share!